Last week's blog post was about the history of camels in the American southwest and how I found myself at a prehistoric camel dig in the middle of eastern Arizona. This week I'm excited to show pictures from the dig and explain the process of taking an ancient camel skeleton out of the desert and into the lab. First, a quick summary of our camel. We estimate that it's about 2.2 to 2.4 million years old, it is one of three camels (and a turtle) found in a small area, it's a sub-adult camel, and its skeleton is complete, meaning that almost all of the bones, from the head to the tail, were found at the same time. All of these details make our camel a rare find, so we want to take extra special care of it.
 |
Me in the field out at the camel dig site. The turtle shell is about
200 feet behind me, and the camel is about 15 feet in front of me.
PC: Jessica Noviello, Nov. 2018. |
On a bright but cold Saturday morning, we piled into pickup trucks with our rock hammers, flathead screwdrivers, hats, jackets, and sunblock and drove out to the dig site. Our group numbered about 15 people, ranging in age from a young boy of 10 to Larry, our senior expert from the local Bureau of Land Management Office. Most of us were volunteers eager to get experience at a real paleontology dig. Two expert paleontologists from the Arizona Museum of Natural History also came along to supervise and give us geologic context. To go out on a dig like this, everyone needs to have at least some experience working with fossils, and everyone must be able to work together as a team, or else we run the risk of damaging or destroying the bones.
I spent most of my weekend working on excavating the camel. Larry had already spent time uncovering it, and previous volunteer teams had already taken the skull and neck, two of the legs, and the hips out of the field. Our goal for the weekend was to remove the torso, and maybe start on getting another leg out of the rock and sand. Others worked on excavating the turtle shell (carapace), a large dome that was roughly 2 feet in diameter. Still others spent time walking around looking for other bone fragments and maybe teeth, a process called
prospecting.
 |
Step 1: We used toilet paper and field "glue" to stabilize the fragile
parts of the camel torso. PC: Jessica Noviello, Nov. 2018. |
There's a big difference between reading about digs and actually being on a dig. I think what surprised me most is how many everyday items are used in paleontology, the first example of which was toilet paper. After we removed the surrounding dirt from the torso but before we could wrap the bones in plaster, we first had to stabilize and protect them from the plaster itself. We did this by gently placing toilet paper on the particularly fragile bits of the camel torso and wetting the paper with a liquid mixture of water and acetate, which we called field "glue."
 |
Dipping burlap strips into the plaster to lay on the camel torso.
PC: Jessica Noviello, Nov. 2018. |
Next we had to wrap the torso up in plaster to protect it on its journey from desert to museum lab. One volunteer, Emelia, was in charge of making the mixture of plaster and water the exact right consistency, which she called "pancake batter." Another volunteer, Alex, was in charge of ripping up burlap cloth. These burlap strips were dragged through the plaster mix and laid on the torso. We applied at least two layers of burlap and plaster to the entire torso, taking special care around the fragile bits. Finally, we put two wood planks onto the top of the torso, which makes the torso easier to carry and move.
 |
The camel torso ready to be flipped! Rock hammer and blue
stuffed dinosaur for scale. PC: Jessica Noviello, Nov. 2018. |
Removing the torso wasn't as easy as just picking it up from the dirt, however. There was still half the torso connected to the dirt underneath the bit we had already excavated. The only solution, therefore, was to flip the torso over. We did this by literally hammering a long rod underneath the torso and using it as a lever. I left the more experienced volunteers to the flipping so I could film it. I was surprised at how quickly it happened. We spent hours preparing the torso, but the actual act of flipping only took about 3 seconds. It was as easy as lifting up on the lever, catching the torso, and lowering it down onto the tarp we had laid out. The tarp allowed us to pick up the entire torso without directly touching it, potentially putting pressure on a weak point in the plaster. Speaking from experience, the tarp made it much easier to carry the torso back out to the cars, though we still needed 4 people to do it.
After we flipped the torso, we were relieved to see that the rod hadn't hit any of the remaining bones, particularly the two legs that were wedged underneath the torso. We were basically drilling blind, so we got really lucky! Unfortunately, the entire torso didn't survive the flip, and some bits and pieces were left behind. We spent the rest of that Saturday closely examining the dirt that was left behind, searching for bone fragments or even some skin impressions. The biggest pieces that were left behind were the ribs, which needed their own plaster jacket before they were moved. You saw these in Part 1 of this blog post.
 |
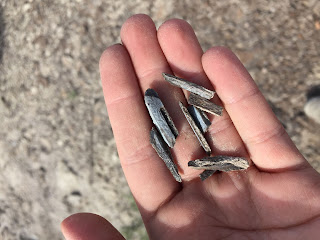
Bone fragments I picked up while prospecting. Notice the
slight purple tinge and the shiny nature of the bones.
PC: Jessica Noviello, Nov. 2018. |
By Sunday there wasn't much left to do on the camel, so I jumped between excavating the turtle shell and prospecting. At first I had a terrible time prospecting. The bone fragments were small and fragmented, so they camouflaged perfectly with the surrounding gravel. I quickly grew frustrated. Thankfully, another member of the Southwest Paleontological Society, Jenny, found a small area that had a bunch of bone fragments, so she called me over to help. I always thought that people exaggerated when they say "once I found one, I easily found tons more," but that's exactly what happened. The bone shards had a slightly purple tinge and a shiny luster that the dull gravel lacked. Once I knew what I was looking for, I couldn't walk two steps without finding more. We carefully put all the fragments into Ziploc bags and labeled them clearly so we had a good record of our data. These bones and bone fragments are true data, evidence of ancient life and a world that doesn't exist anymore. We don't get a second chance to find these if they are lost or destroyed, so we take the process seriously.
Soon after we packed up and covered the remainder of the camel with sand, to be dug up by future groups. The rest of the camel and the turtle headed back to Mesa, where more volunteers would remove the plastic and clean up the bones. I had a great time going out on my first paleontology dig, and if I wasn't in a desperate rush to finish my PhD this spring, I'd be going out again to finish the job. If you are interested in participating in a paleontology dig, I'd first suggest reading up on the subject, and then reaching out to a local museum to get experience working with fossils or in a lab. It is definitely a special experience, and one I am so thankful to have. At the very least, it makes for a great adventure story!
 |
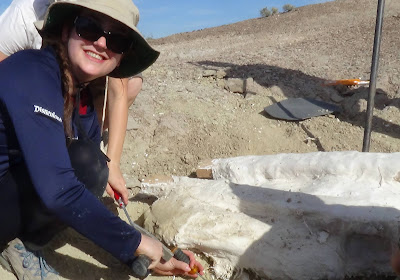
Me digging out the camel torso and preparing it to be flipped.
This is why we use flathead screwdrivers!
PC: Jessica Noviello, Nov. 2018. |


No comments:
Post a Comment